Home Downloads Contact Windows Install MacOS Install Contribute User Help
Windows Instructions for Running Kelpup
What You’ll Need
- A 1 GB or larger flashdrive
- Wifi
- A laptop running Microsoft Windows
- Time!
Windows Surface Users (and potentially others)
There’s a chance that disabling secure boot doesn’t work on your Windows Surface Machine (and maybe other devices). If that’s the case, you can run a virtual machine using Virtual Box instead! Check out our tutorial.
Or, you can use this Ubuntu tutorial on how to make a virtual machine on Virtual Box with an Ubuntu ISO. Just follow these directions are replace the Ubuntu ISO with the Kelpup ISO you downloaded.
Step 1 - Download ISO
We say that you can “burn our ISO” onto a flashdrive, and use that to run our disro on your computer. But what does that really mean?
“The idea behind an ISO image is that you can archive an exact digital copy of a disc, and then later use that image to burn a new disc that’s in turn an exact copy of the original (…) most operating systems allow you to mount an ISO image as a virtual disc, in which case all your apps treat it as if a real optical disc were inserted.” - (source)
So when you download our ISO file, it is really just a copy of the linux distribution we have created. By “burning” it onto a flashdrive, you are just making your own portable copy that you can then insert and boot on your own machine.
Download your ISO from the Downloads page, but don’t open it!
Step 2 - Download Rufus
Following the link above to Rufus’ website, navigate to the large “download” button near the top of the home page.
Click the button and boot up the software.
Step 3 - Choosing USB Device
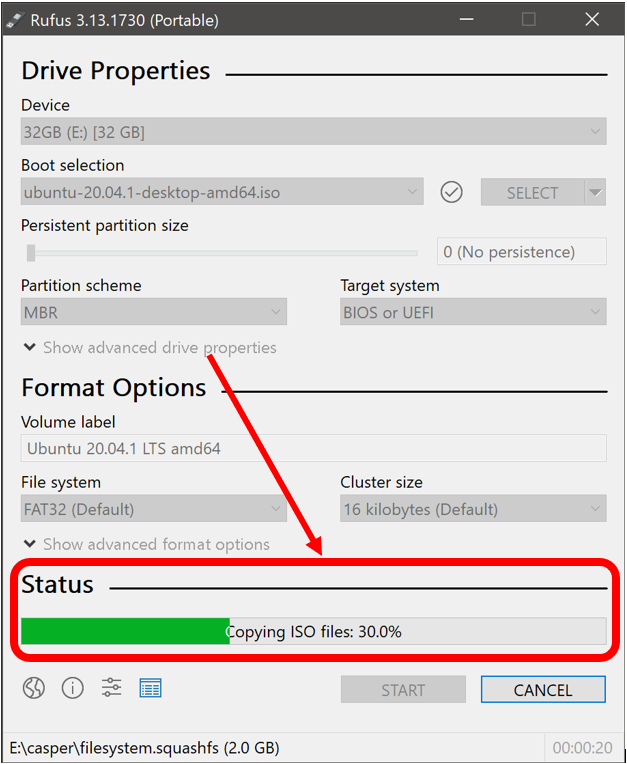
Upon booting up the software, the following option menu will greet you:
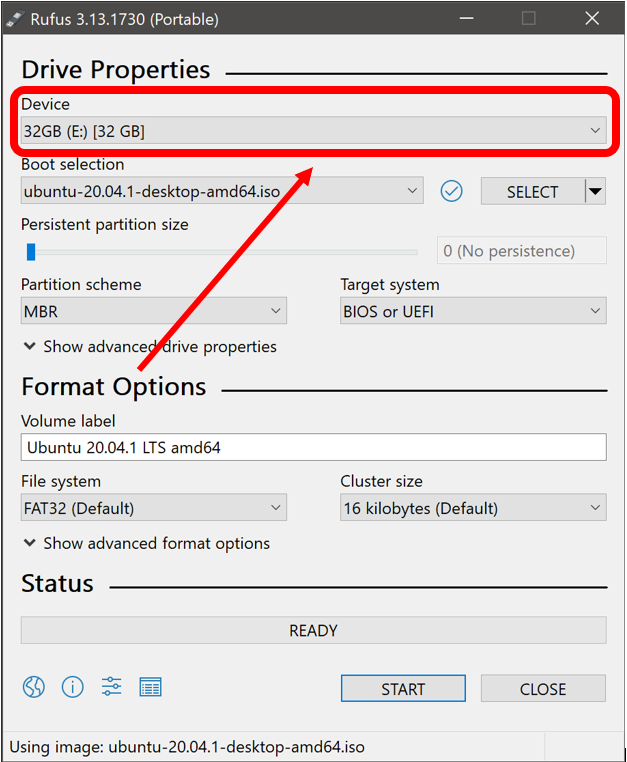
The first step is to let Rufus know what device you’ll be burning to. To do this, plug in your external USB, and navigate to the “Device” field of the menu. From there, select your personal USB.
Step 4 - Select the Kelpup Linux Distro as Your ISO File
Once you have the ISO downloaded, make sure you know where it is downloaded on your computer. Then, click on the “Select” drop down to the right of the Boot Selection menu.
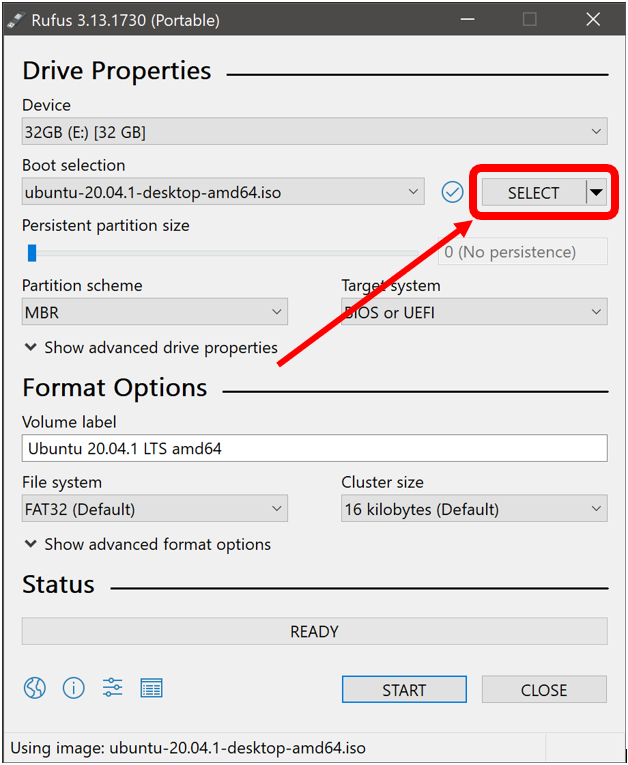
Navigate to your Kelpup download, and select “open”.
Step 5 - Burn the ISO
Click on the “Start” button, leaving all other settings at default.
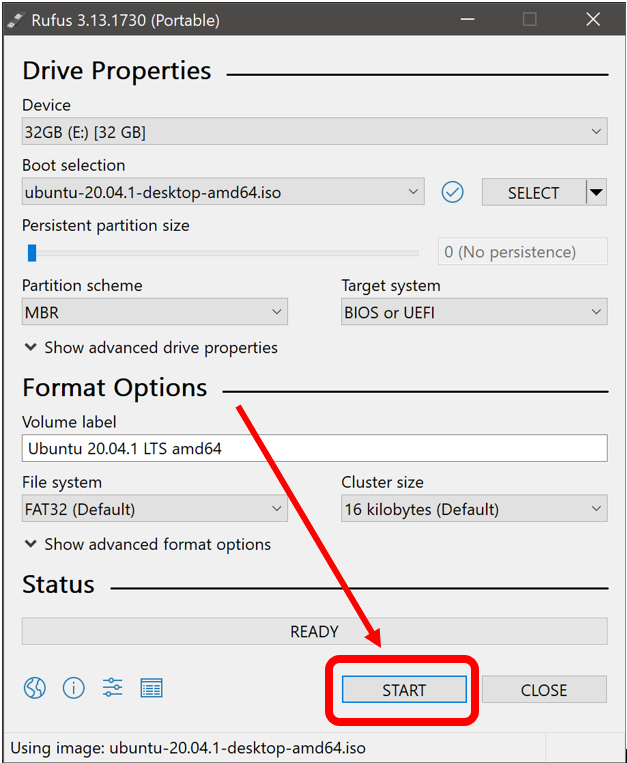
You may encounter additional warnings or pop ups after pressing start:
# "Download Required":
  - Rufus requires supplemental files to burn your ISO.
  - Simply press "Ok" to resolve the issue.
  - More files will be installed.
# "ISOHybrid Image Detected":
  - Rufus recognizes your ISO as being compatable with aditional discs.
  - Simply select the "Write in ISO Image Mode" bubble to continue.
  - It will be the recommended / default option.
# "Data Destruction Warning":
  - All previous contents on the USB will be overwritten.
  - If this is not acceptable, select a new device.
  - Otherwise, simply press "Ok"
While the ISO burns, you will see a status bar that shows progress. Most ISO burnings will take ~2 minutes.
Step 6 - Using the ISO
NOTE: While these instructions work for some Windows Machines, it’s probably best to look up how to enter the BIOS boot menu on your machine. You might also get a warning about “unsafe device” once you do boot up; you probably have to disable BitLocker or similar software that your machine has. For things like this, Google is your best friend!
When the progress bar fills, you can select “Close” and quit Rufus. To use the ISO, simply insert it into an external port on your Windows computer, reset your computer, and pull up the BIOS menu. Typcially you can do this using one of the following hotkeys, depending on your version of BIOS:
- ESC
- F1
- F2
- F8
- F10
Choose to enter BIOS Setup, and the following utility page will appear:
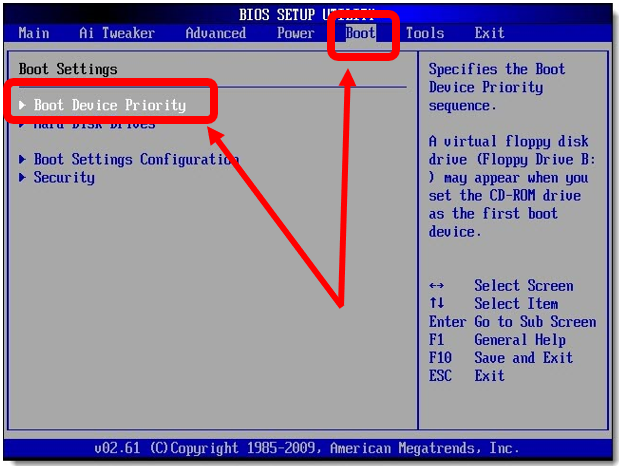
Navigate to the “Boot” tab. All of your avalible system devices will be displayed here in the order of their priority. To run Kelpup Linux, you will have to move it such that it is number one in the list. When you have done this, your computer will automatically reboot and run Kelpie Puppy Linux!
When you’re done with Kelpup, just hit the power button and turn your computer off. Hit the power button again to turn it back on, and Windows will start automatically. You can save your session if you’d like, but if you got Kelpup to work, we think you should try your hand at a bunch of distros, and decide which one is your favorite! Kelpup isn’t designed to be a home base distro, but a stepping stone.
What’s Next?
Now that you’ve successfully dual-booted your computer with a bootable USB running Kelpup, you could do the same process with almost any Linux distro!! Here’s an overview to help you decide your next distro. You can check out these links for specific resources, but you should be able to just grab an ISO and repeat the same steps (minus disabling BitLocker that is!).
If you’d feel more comfortable following directions, Ubuntu super user-friendly distro with a bunch of free apps, and a tutorial that’s pretty complete.
Other distros you could try out:
Video Instructions

Click anywhere on the window!